Most people buy the rack first and work out the setup second. That is backwards. A hitch bike rack setup is a chain of four links: the receiver on the car, the rack in the receiver, the bike on the rack, and the wall the bikes live on the other six days of the week. Break one link and you either scratch a frame, fight your own hatch every time you load groceries, or watch a bike bounce down the shoulder at highway speed.
I ride road and gravel out of Boulder, Colorado. Most weekends that means loading two bikes in the dark, driving into the mountains, and unloading at a trailhead before the sun is up. I have done that with a trunk strap rack, a hanging rack, and a tray rack, and the lesson is always the same. The routine keeps the bikes attached, not the sticker on the rack.
This guide walks the sequence in the order I actually do it. Check the hitch, set up home storage, seat the rack so it stops moving, load the bikes, then test the whole thing before you trust it at 75 mph.
Why you should trust me
I have owned eight racks in twelve years and I still keep notes on every one of them. I time installs with a stopwatch, because install time is a real spec: a rack that takes half an hour to mount gets used half as often as one that takes five minutes. I load in the dark on purpose, because that is the workflow that matters after a long ride when your hands are cold and your headlight is weak.
I have also watched a cheap rack fail. A strap let go at speed and the bike it was holding went into a highway divider. Nobody was hurt. The frame did not survive. Since then I have treated a rack as safety equipment, and I check the hitch pin and the wheel straps the same way I check brake pads.
What I will not do is pretend I have mounted every rack on the market. What I can give you is the order of operations, the checks that catch the common failures, and two products that cover the two halves of this job at very different price points.
How I picked these two
Every rack decision starts with hitch class. A 1.25 inch receiver limits you to lighter two bike setups, and you will feel more movement at speed. A 2 inch receiver is the real standard, and it opens up the entire tray rack segment. If you are shopping for a rack before you know your hitch class, stop and go look at the sticker on your receiver.
The second question is what you carry. A road bike and an electric bike do not make the same demands on a rack, and the difference shows up in the wheel trays, the straps, and the weight rating.
The third question is how the rack holds the bike. Hanging racks hook the frame. Tray racks hold the wheels. If you ride carbon, hanging racks are off the table, full stop. A tray rack spreads the load across the tires and never touches your frame.
For storage at home the criteria flip. You care about stud spacing, hook spacing, whether the hanger keeps wheels off the floor, and whether it blocks the garage door or the path to the car.
The two picks below sit at opposite ends of the price scale, and that is deliberate. One is a wall hanger for a household with too many bikes and not enough floor. The other is a heavy duty hitch tray built for the fat tire and e-bike era.
What you need before you start
- A tape measure and a stud finder
- A level and a drill with the right bits
- A torque wrench or a socket set
- A headlamp, for the first load after dark
- A second person, for the wall mount
Then do two checks that have nothing to do with the rack.
First, find your hitch rating. The rack, the bikes, and the hardware all count against the tongue weight limit your vehicle is rated for. Two e-bikes plus a heavy tray rack is a real load, and the number is printed in your owner's manual or on the hitch itself.
Second, inspect the receiver. Rust, a bent pin hole, or a deformed tube means fix that before you add a rack. A rack cannot be more solid than the hole it slides into.
Wall storage first, because it clears the floor
The wall rack is the part people skip, and it is the part that changes daily life. Bikes on the floor get leaned, stepped over, and knocked into. Bikes on a wall hanger come off the hook and go straight onto the car.
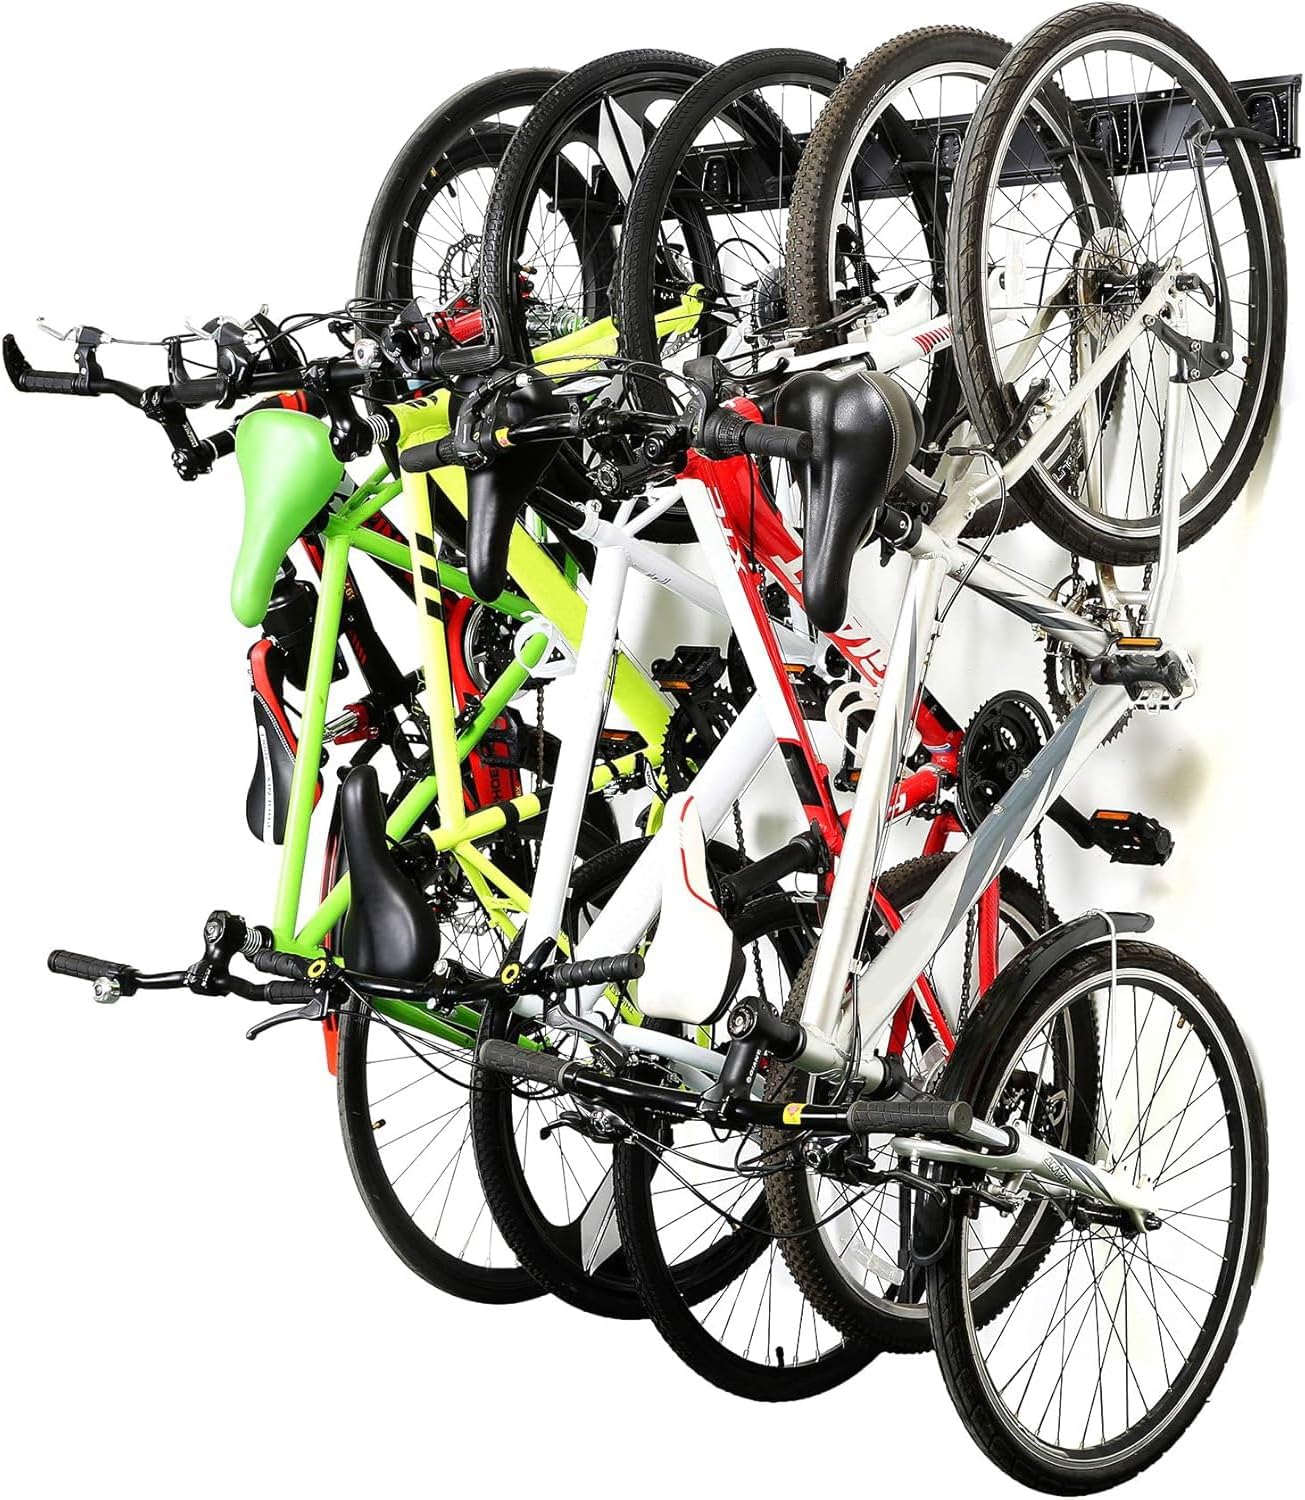
Budget pick: Ultrawall Stainless Steel Bike Storage Rack, Wall Mount 6 Bike Hanger
 Visit on Amazon →
This is the storage half of the setup, and it is the cheaper half by a wide margin. Stainless steel construction, six hooks, wall mounted, which means six bikes off the garage floor and out of the walking path.
The install is simple but not careless. Find your studs first, because drywall anchors alone will not hold a bike that gets yanked off a hook every Saturday morning. Mark your height so the rear wheel clears the floor with room for a pedal to swing, and check that height against your longest bike before you drill anything.
Then get a second person for the first hook. You are holding a steel rack against a wall, marking holes, and trying to keep it level, and that is a three hand job.
Flaws but not dealbreakers: A wall hanger is only as good as the wall behind it. If your studs do not land where you want the hanger, add a plywood backer board and bolt into that. Also think about hook spacing before you commit, because six bikes on one wall is great until you realize you have to lift the third bike over the second one to reach the fourth.
Anyone with more bikes than floor space, and a garage or shed wall with real studs behind it, will get years out of this.
The hitch rack: the half that goes on the car
This is where the safety budget belongs. A wall hanger holds a parked bike. A hitch rack holds a bike at 75 mph with crosswind, semis, and expansion joints working against it.
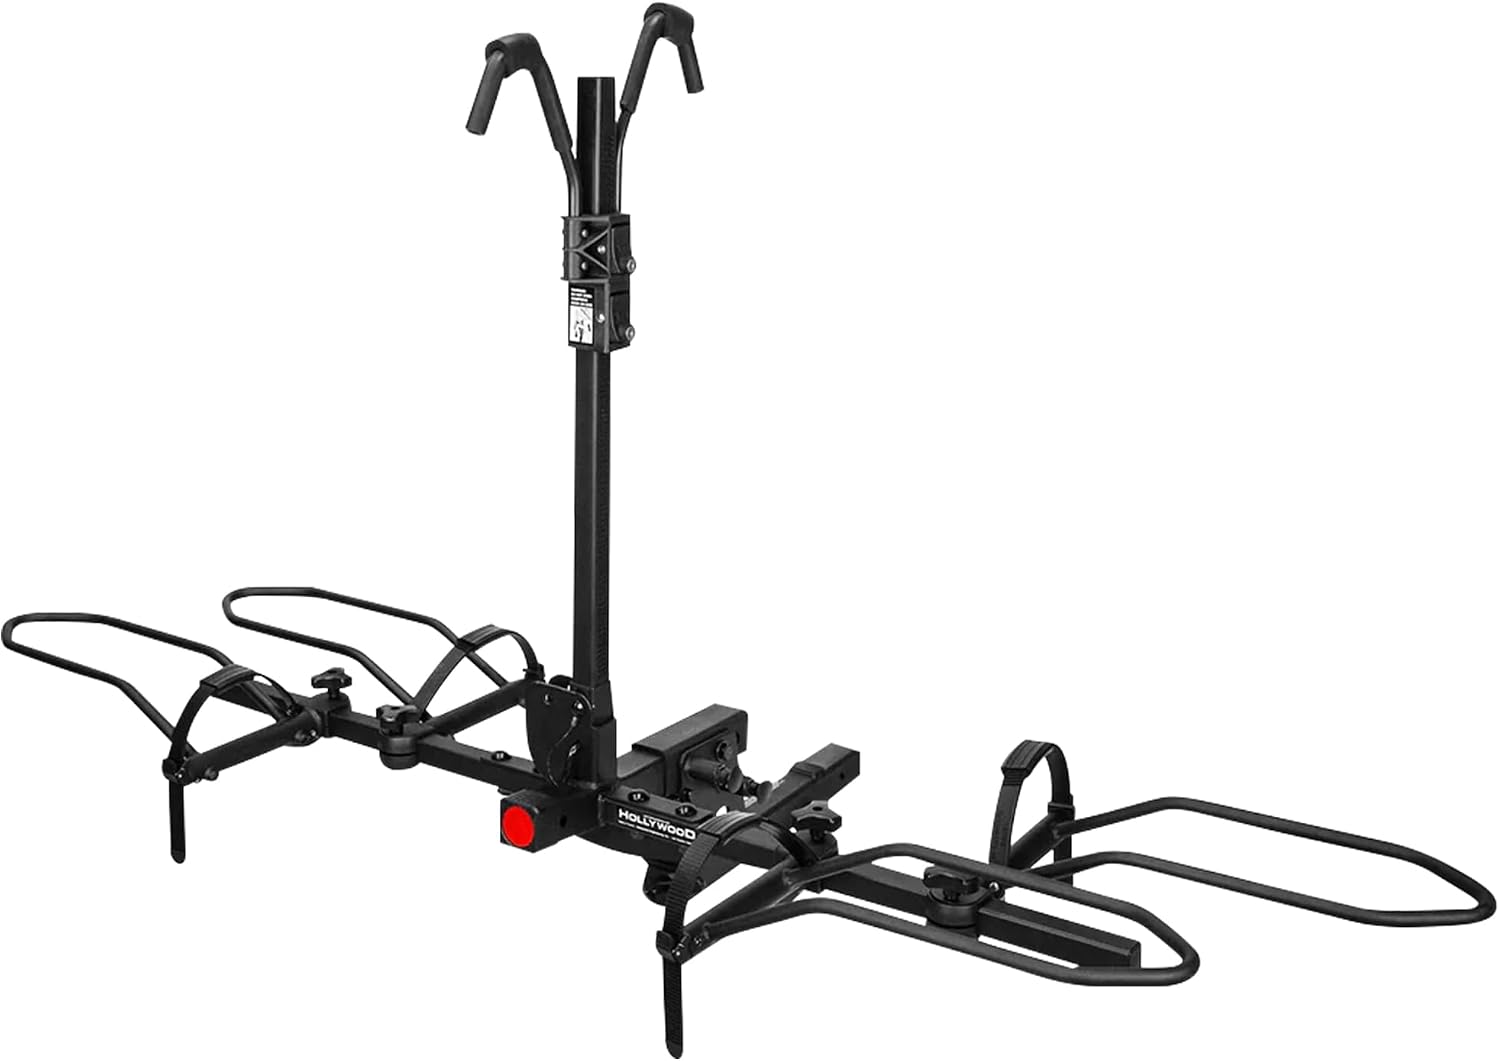
Our pick: Hollywood Racks Sport Rider 2" Hitch Bike Rack, Carries 2 Bikes up to 80 lbs Each for Standard, Fat Tire and Electric Bicycles - Heavy Duty, Foldable Ebike Rack for Car, Truck, and SUV
 Visit on Amazon →
This is the tray rack I point people toward when the bikes are heavy. It fits a 2 inch hitch, carries two bikes at up to 80 lbs each, and handles standard, fat tire, and electric bicycles, which is the whole reason it exists. The foldable design matters more than it sounds: a rack that folds out of the way when it is empty is a rack you leave on the car, and a rack you leave on the car is one you actually use.
The 80 lbs per bike rating is the number to focus on. Most racks are built around the weight of a road bike and start flexing when you hang a battery and a motor on them. This one is aimed at that heavier class.
Flaws but not dealbreakers: It needs a 2 inch receiver, so a 1.25 inch hitch is out. It is also heavy to lift into the hitch by yourself, so plan on a two person first install or a rolling jack. And because it is built for heavy bikes, it is more rack than a household hauling two light road bikes strictly needs.
Anyone hauling e-bikes, fat bikes, or a mix of both on a 2 inch hitch should start here.
The step by step setup
Step one: confirm the receiver size. Measure the inside of the receiver. This rack is a 2 inch rack, and no adapter makes a 1.25 inch receiver behave like a 2 inch one. Adapters add slop, and slop becomes wobble.
Step two: check the tongue weight rating. Add the rack weight, the bike weights, and a margin. If the total is close to your vehicle's limit, carry one bike or move the load to a lighter rack.
Step three: clean and inspect the receiver. Wire brush the rust, wipe it out, and check the pin hole for elongation. Grease the pin so it comes out next October.
Step four: seat the rack. Slide it in until the pin hole lines up, insert the pin, and clip it. Then tighten the anti-rattle device or the threaded stabilizer until the rack stops moving inside the receiver. This is the step people skip, and it is the step that causes the rattle they complain about.
Step five: shake test. Grab the mast and push it side to side. You want the rack to move with the car, not inside the hitch. If you can feel it shift in the receiver, tighten more or check that the pin is fully seated.
Step six: load the first bike. Put the heavier bike in the position closest to the vehicle. Lift by the frame, not the rear wheel, and set both tires into the trays.
Step seven: strap the wheels. Run the wheel strap over the rim and around the tire, not across the spokes. Snug it, then push the bike forward and back to make sure the wheels cannot roll out of the trays. Add the anti-sway strap or arm if your rack has one.
Step eight: check the fold and the lights. Fold the rack up or down as designed and make sure it clears the bumper and the exhaust. Then walk to the back of the car and confirm your brake lights and turn signals are still visible and your backup camera is not fully blocked.
Step nine: the five minute shakedown. Drive five minutes, stop somewhere safe, and recheck the hitch pin, the anti-rattle bolt, and every wheel strap. New installs settle.
Step ten: the highway check. Get on the interstate and watch the rack in the mirror at 65 to 75 mph. You are looking for a rack that stays in the same place in your mirror, not one that rocks on every expansion joint. If it rocks, pull over and tighten before you keep going.
Step eleven: hang the wall rack. Studs first, height second, second person third. Mark, level, drill, bolt. Load the heaviest bike on the lowest hook and work up.
Step twelve: build the dark load routine. Headlamp on the hook next to the wall rack. Load the drive side out so the chainring faces away from the car. Do it the same way every time, because a routine is what you fall back on when you are tired.
What I left out and why
Trunk racks are for occasional use on inexpensive bikes. They rest on paint, they move in wind, and they block lights and plates. I will not recommend one for a bike you actually care about, and I will not pretend a strap system is a substitute for a receiver.
Hanging racks are cheaper and lighter, but they hold the bike by the frame. If you ride carbon, that is the end of the conversation. If you ride a step-through or a heavy e-bike, a hanging rack can be genuinely hard to load because you are lifting the whole bike onto a hook.
Roof racks are a different discipline with different physics, and I do not write about them. Same for RV and fifth wheel setups, where the wind and weight math changes completely.
1.25 inch hitch racks are not wrong, they are just limited. If that is what your car has, stay within the two bike, lighter weight segment and accept that you will see more movement at speed.
What this setup costs you over a season
No rack is free, but the money is not the interesting part. The interesting part is the time and the risk.
A wall rack pays you back every single day. It turns a five minute floor shuffle into a fifteen second lift off a hook, and it keeps bikes out of the path of a car backing out of the garage.
A hitch rack pays you back in the one event you never want to test. The difference between a solid tray rack and a marginal one is not comfort at 75 mph. It is whether the bike is still on the car when you stop for coffee.
And the install time is a spec, not a footnote. Twenty minutes of careful setup in your driveway, done once, is what makes every load after that a two minute job.
Do the checks in order. Receiver, hitch rating, seat and tighten, load and strap, shakedown, highway. Then hang the rest of the bikes on the wall and stop tripping over them.